Sunday, September 6, 2015

Cassava Leaves Curry


Cassava is a growing staple food that can feed the starving people of the world.  Most Westerners knows cassava as the tapioca plant, the root are made into tapioca for your tapioca pudding, and the cooked roots taste a lot like potato.  Cassava leaves and roots are high in hydrocyanic acid which is poisonous, but when cooked, the acid disappears, and be sure to discard the water the leaves are boil in. Cassava leaves must be cooked for at least 10 minutes.


Cassava leaves don’t have much flavor and absorb any flavoring that you add. So adding spices, meats, and other veggies enhances the flavor.  Cassava leaves are a staple in Indonesian cooking.


Cassava leaves curry is one of the dishes you can find easily when you visit a Padang restaurant which I almost always choose whenever I eat there.  In West Sumatera, this curry is usually made from fiddlehead, that’s why they call it “gulai daun paku”. However cassava leaves are widely used in making this dish. If you have trouble finding cassava leaves, you can actually substitute them with equal amount of kale, but be sure to discard the hard part of the leaves.


For those who don’t know,  100 grams of cooked cassava leaves provides about 3.7 grams of protein which is pretty good for a green leafy veggie. And the leaves contain different types of proteins comparable to eggs and soybeans. And cassava leaves contain lysine, isoleucine, leucine, valine, and lots of arginine which are not common in green leafy plants… thus making it a great protein source. The amazing protein content of cassava leaves is also comparable to sweet potato leaves and peanut leaves, and up to 10 times more protein is found in cassava leaves than in the roots.


Cassava Leaves Curry
For recipe in Indonesian, click HERE

Ingredients:
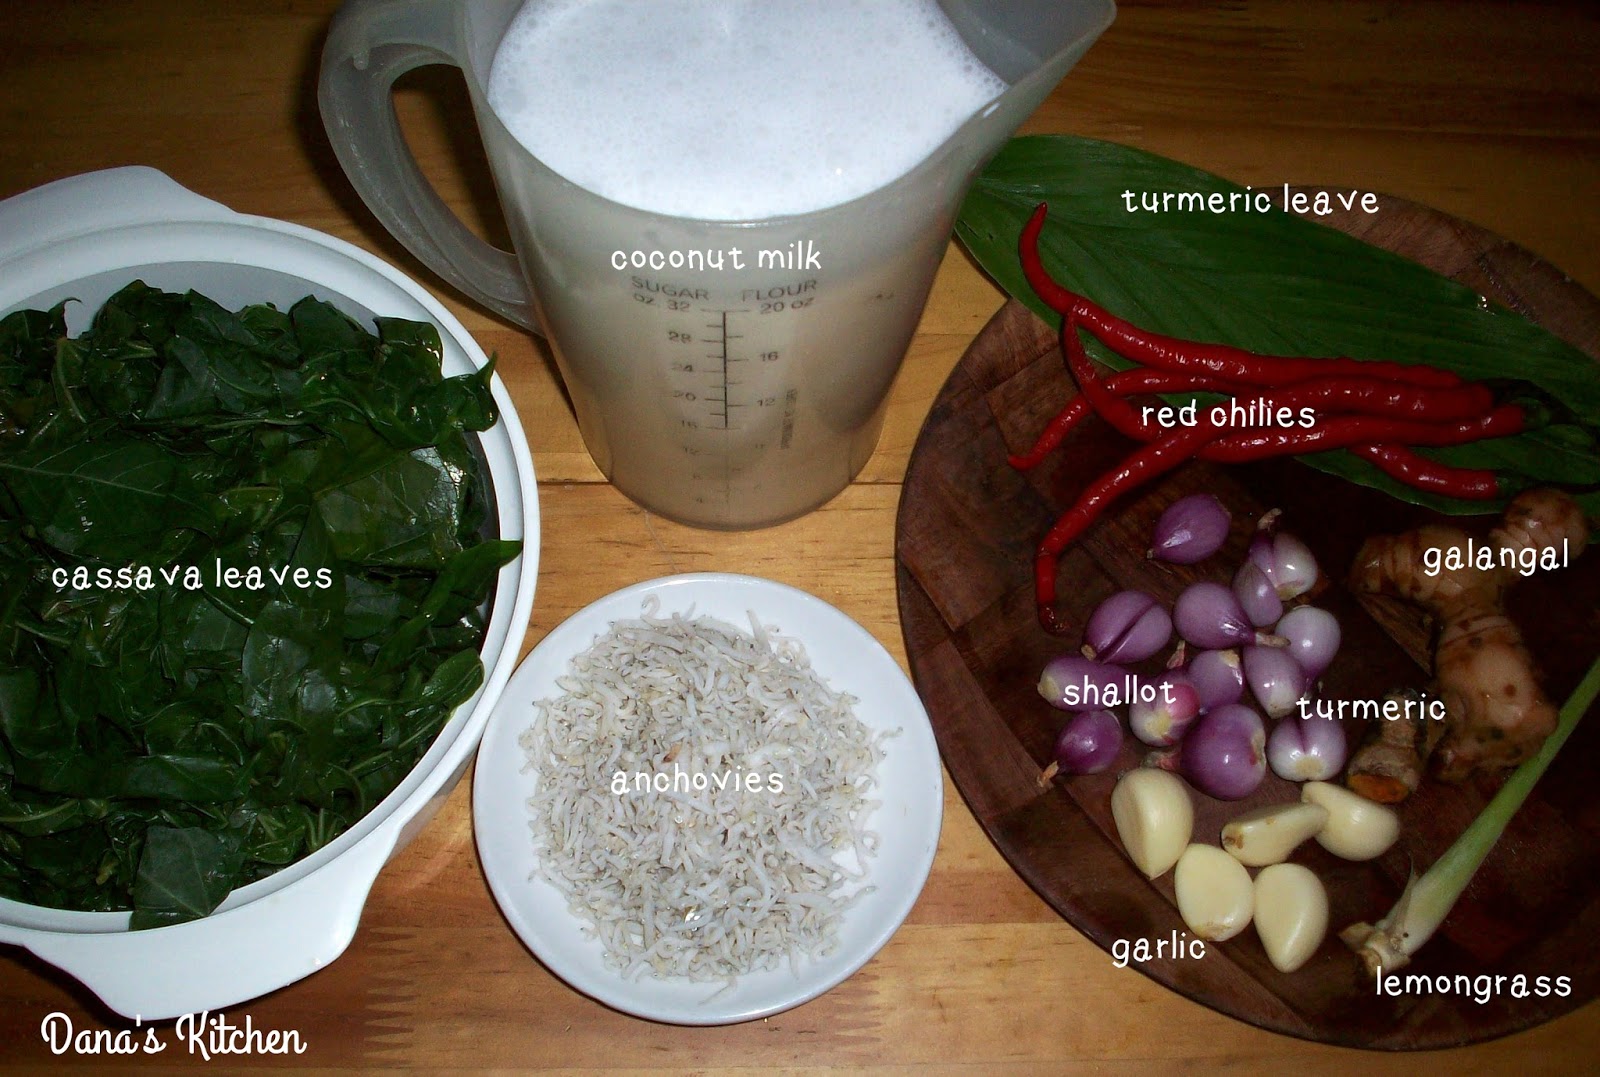

·         2 bunch of cassava leaves (about 300 gram), washed and drained
·         1 inch fresh galangal, bruised
·         1 lemongrass, bruised
·         2 teaspoon salt
·         1 teaspoon sugar
·         1 teaspoon dried shrimp, brewed, roasted, mashed
·         100 gram fried anchovies (I use ‘teri medan’)
·         1 fresh turmeric leaf
·         600 ml water
·         400 ml  thick coconut milk
·         Oil for frying

Spice for the paste:
·         10 shallots
·         4 cloves garlic
·         3 red chilies
·         2 inch fresh turmeric, burned

Directions:
1.       Boil the cassava leaves with salt until tender. Set aside to drain, then roughly slice.


2.       Heat oil in a frying pan, fry the anchovies until golden brown, set aside.


3.       Put all ingredients for the seasoning paste in a blender or food processor, and blend until smooth (add a little bit of oil to help the blending process if necessary).


4.       Heat 2 tablespoons oil in a saucepan, stir-fry the paste with galangal, lemongrass, and turmeric leaf until fragrant. Add the dried shrimp.  Mix well.


5.       Transfer the paste to a larger saucepan. Add in the water and bring to boil over medium heat. Add the cassava leaves which have been roughly sliced.  Pour in the thick coconut milk, bring to boil then reduce the heat while continue stirring for 15-20 minutes. Add the fried anchovies.


6.       Adjust the seasoning, add salt and sugar to taste.


Bahasa Indonesia

Bahan:


·         2 ikat daun singkong (sekitar 300 gram), cuci dan tiriskan
·         3 cm lengkuas, memarkan
·         1 batang serai, memarkan
·         2 sendok teh garam
·         1 sendok the gula pasir
·         1 sendok the ebi, sangria dan haluskan
·         1 lembar daun kunyit
·         600 ml air
·         400 ml santan kental

Bumbu halus:
·         10 butir bawang merah
·         4 siung bawang putih
·         3 buah cabe merah
·         5 cm kunyit, dibakar

Cara:
1.       Rebus daun singkong dan 1 sendok teh garam dalam 1.000 ml air sampai matang.  Angkat, tiriskan, peras, dam iris kasar.  Sisihkan.
2.       Panaskan minyak, goring ikan teri medan setengah matang. Sisihkan.
3.       Blender semua bahan untuk bumbu halus.


4.       Panaskan 2 sendok makan minyak. Tumis bumbu halus, lengkuas, serai, dan daun kunyit sampai harum. Masukkan ebi, aduk rata.
5.       Pindahkan ke dalam panci yang lebih besar.  Tuang air dan masak hingga hampir mendidih.  Masukkan irisan daun singkong.  Tuang santan kental dan masak sampai mendidih sambil terus diaduk.  Masukkan ikan teri medan, aduk rata.
6.       Tambahkan garam dan gula sesuai selera. 


Friday, September 4, 2015

Baked Chicken Teriyaki


Growing up in Jakarta with many Japanese restaurants, I had my fair share of teriyaki meat. I’ve tried lots of recipes and store products, but could never quite replicate the smell and flavors that I remember.  Until now.  These are absolutely the best teriyaki chicken thighs I have ever made and quite easy to make.


As a mother, sometimes all I want is to throw something in the oven and be done with it.  Not every meal needs to be super glamorous, but should taste great. This baked chicken teriyaki recipe is something quick and delicious on the go to try.


Yesterday, I decided to take this family favorite and bake it. Prepare this in the middle of the day and let them marinate. The marinade and glaze is to die for. You can never go wrong with an amazing homemade teriyaki glaze.  And baking the chicken still keeps it light and delicious.  Perfect served over some steamed rice and a side of vegetables, and the best part… the entire family devoured it!


Baked Chicken Teriyaki (adapted from allrecipes)
For recipe in Indonesian, click HERE

Ingredients:


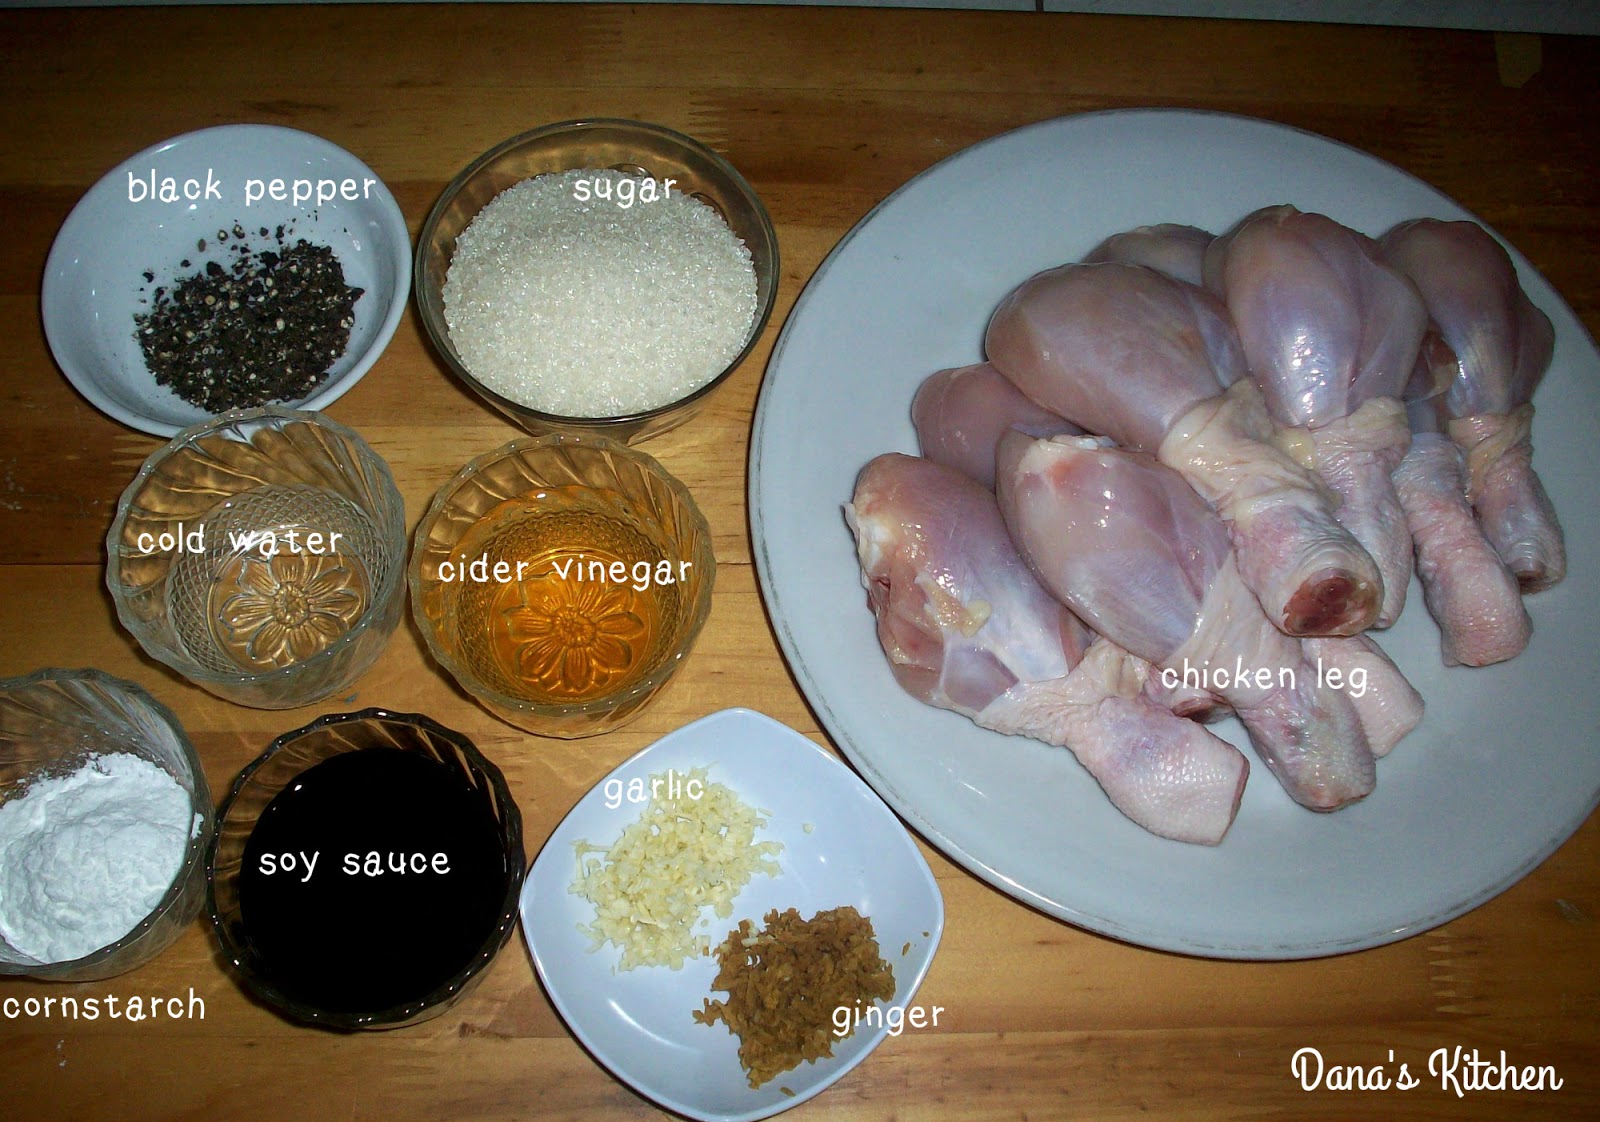
·         12 chicken thighs
·         ½  teaspoon ground black pepper
·         1 teaspoon ground ginger
·         2 clove garlic, minced
·         ½ cup cider vinegar
·         1 cup soy sauce
·         1 cup white sugar
·         2 tablespoon cold water
·         2 tablespoon cornstarch
·         2 stalks of scallion, chopped
·         1 teaspoon sesame seed (optional)

Directions:


1.       In a small saucepan over low heat, combine the cornstarch, cold water, sugar, soy sauce, vinegar, garlic, ginger, ground black pepper, and sesame seed.  Let simmer, stirring frequently, until sauce thickens and bubbles. Let it cool in room temperature.
2.       Transfer ½ of the sauce to a resealable plastic bag and add the chicken.  Seal bag and marinate the chicken in the refrigerator, turning once, for 1 hour.  The chicken can be marinated for up to 4 hours.
3.       Preheat oven to 425 degrees F (220 degrees C).


4.       Place chicken pieces in a lightly greased baking dish. Brush chicken with the remaining sauce.  Turn pieces over, and brush again.
5.       Bake in the preheated oven for 30 minutes. Turn pieces over and bake for another 30 minutes, until no longer pink and juices run clear.  Brush with sauce every 10 minutes during cooking.
6.       Serve with warm steamed rice and vegetables, drizzle with remaining cooked sauce and garnish with chopped scallions.


Bahasa Indonesia
Bahan:


·         12 paha ayam
·         ½  sendok teh merica hitam bubuk
·         1 sendok teh jahe parut
·         2 siung bawang putih, cincang halus
·         ½ cup cuka apel
·         1 cup soy sauce
·         1 cup gula pasir
·         2 sendok makan air dingin
·         2 sendok makan maizena
·         2 batang daun bawang, iris
·         1 sendok teh wijen (optional)

Cara:


1.       Dalam panci kecil di atas api kecil, campur maizena, air dingin, gula, kecap asin, cuka, bawang putih, jahe, merica hitam, dan wijen.  Biarkan mendidih sambil diaduk, sampai saus mengental dan berbusa. Biarkan dingin.
2.       Tuang ½  saus ke dalam resealable plastic bag, masukkan ayam. Marinasi ayam di dalam lemari pendingin selama 1 sampai 4 jam.
3.       Panaskan oven dengan suhu 425 derajat F (220 derajat C).
4.       Susun paha ayam dalam wadah tahan panas yang telah diolesi minyak. Olesi permukaan ayam dengan saus. Balikkan dan olesi permukaan satunya dengan saus.
5.       Panggang selama 30 menit. Balikkan posisi ayam dan panggang lagi selama 30 menit sampai matang dan mengeluarkan kaldu. Olesi dengan saus setiap 10 menit selama pemanggangan.
6.       Sajikan bersama nasi hangat dan sayuran, tuang sisa saus yang sudah dipanaskan kembali dan taburi dengan irisan daun bawang.


Tuesday, June 30, 2015

Chocolate Brownie Crinkles


Like every recipe, including the very simplest,  chocolate crinkles have gone through a number of permutations, including espresso powder which gives the chocolate flavor a boost while adding the merest aromatic hint of itself. The original chocolate crinkle cookie used baking chocolate and not chocolate chips or chopped chocolate being melted.  Cocoa powder makes the cookies chewy on the inside while melted chocolate makes cookies come out fudge-like.


Deeply chocolate, crisp and powdered on the outside, and soft and chewy in the center.  If you can imagine what a brownie would taste like in cookie form, this is it.  Rolling richly flavored cocoa cookies with white powdered sugar before baking creates a dramatic crackled look that give these sweets—a perfect cross between a brownie and cookie—a fancy appearance with virtually no effort.


I also baked these cookies using the espresso powder and they were fantastic.  I have only one complaint, they were addictive! I couldn’t walk by the cookie jar without hearing a cookie call my name J I noticed some have trouble with the dough being too sticky. Refrigerate the dough for minimal 3 hours or up to overnight or you can freeze the dough for 45 minutes.  Before forming into balls, get your hands wet so they won’t stick to them.  You might have to pop them back in the freezer if it’s a hot day.  Don’t try to handle them when they’re warm because you will just be wasting your time. For those who are having trouble with the top cracking, here’s a tip: place your cookie sheet on the second to-the-top rack and only bake one cookie sheet at a time.  The hot heat at the top of the oven enables the cookie to crack.


Trust me, these cookies are a delight to make.  They are simple, chewy, and delicious. Rich cookies that remind me of tiny brownies, that’s why I would like to call it chocolate brownie crinkles. I always make the dough a day before I plan to bake these. I found that the more chilled the dough is, the easier it is to roll into balls, and since I coated them heavily in the powdered sugar, they were beautiful after baking.  I was rewarded with a beautiful crackly-top.  The sugar doesn’t absorb into the cookie at all. Perfection! A delightful new addition to my Eid baking.


Chocolate Brownie Crinkles (adapted from Laura Vitale)
For recipe in Indonesian, click HERE

Ingredients:


·         1 cup all-purpose flour
·         2 eggs
·         2/3 cup of light brown sugar
·         ½ cup cocoa powder
·         ¼ cup unsalted butter, softened at room temperature
·         1 teaspoon baking powder
·         ¼ teaspoon salt
·         ½ teaspoon instant espresso powder
·         1 teaspoon vanilla extract
·         ½ cup confectioner sugar

Directions:
1.       In a bowl, whisk together the flour, cocoa powder, salt, baking powder, and instant espresso powder.  Set aside.


2.       In the bowl of a standing mixer fitted with a paddle attachment, cream together the butter and sugar, add the vanilla and eggs.  Mix until creamy and smooth.
3.       Add the dry ingredients and mix them long enough to combine.
4.       Place the dough in a bowl, cover and refrigerate for a minimum of 3 hours or up to overnight.
5.       Preheat oven to 325 degrees F (160 degrees C), line a couple of baking sheet with parchment paper and set aside.


6.       Place confectioner sugar in a shallow bowl.  Working with 2 spoons (or a small ice cream scoop) at a time, roll into balls and coat them in the confectioner sugar, place them a couple of inches on your prepared baking sheets.


7.       Bake the cookies, 1 sheet at a time, until puffed and cracked and edges have begun to set, but the centers are still soft (cookies will look raw between cracks and seem underdone) for 10 to 12 minutes, rotating sheet halfway through baking and allow them to cool completely before serving.  The cookies can be stored at room temperature in an airtight container for up to 5 days.


Bahan:


·         1 cup tepung terigu serbaguna
·         2 butir telur
·         2/3 cup light brown sugar
·         ½ cup bubuk kakao
·         ¼ cup unsalted butter, lelehkan pada suhu ruang
·         1 sdt baking powder
·         ¼ sdt garam
·         ½ sdt bubuk espresso instan
·         1 sdt ekstrak  vanila
·         ½ cup gula halus

Cara:
1.       Dalam mangkuk, ayak dan aduk bersama tepung terigu, bubuk kakao, garam, baking powder, dan bubuk espresso.  Sisihkan.


2.       Kocok mentega dan gula dengan menggunakan mikser listrik, tambahkan vanilla dan telur. Kocok sampai creamy dan lembut.
3.       Tambahkan bahan kering dan aduk cukup lama sampai bercampur.
4.       Letakkan adonan dalam mangkuk, tutup dengan plastic wrap dan dinginkan dalam kulkas selama minimum 3 jam atau sampai semalam.
5.       Panaskan oven dengan suhu 325 derajat F (160 derajat C), siapkan loyang yang telah dialasi dengan kertas roti.


6.       Letakkan gula halus dalam mangkuk.  Ambil 2 sendok (atau gunakan ice cream scoop yang kecil) adonan, bulatkan dan gulingkan dalam gula halus sampai semua permukaan tertutup gula halus.  Letakkan di atas loyang, beri jarak. Lakukan sampai adonan habis.


7.       Panggang satu loyang bergantian selama 10-12 menit sampai kue mengembang dan permukaannya retak serta  pinggirannya matang, tetapi bagian tengahnya masih lembek (kue kelihatan belum matang di bagian retakan), putar posisi loyang selama pemanggangan.  Biarkan benar-benar dingin sebelum disajikan.  Kue dapat di simpan pada suhu ruang di dalam wadah kedap udara selama 5 hari.  


Green Tea Tuiles


Tuiles are ultrathin, crisp curved cookies that imitate the shape of a French roof tile (tuile means “tile” in French).  In addition to the classic arch shape, the versatile batter can be spread into large rounds for molding into cups to hold ice cream, berries or mousse, or into long strips that can be twisted into corkscrews for a fanciful garnish.  These delicate cookies are most successful when baked on silicone-coated nonstick liners.


Almond tuiles are made by mixing the sliced almonds into the batter and then stenciled or shaped into round disk using a fork.  Although a real tuile is curved into the shape of a terra cotta roof tile, they can be left flat and used as a gelato or sorbet sandwich.


There are many types of tuiles, but one which seem to be the most appreciated is the classic almond tuile.  Crisp and light and delicately almond scented. I have tried various store-bought tuiles except for this green tea tuiles which I baked today.  I know, some still think that green tea flavor is passé in the culinary world, but I’m still crazy about it and couldn’t get enough of it.


The green tea tuiles were great. I liked them a lot because they were very light, delicate, and crispy with a nice green tea aroma. The tuiles are best the day they are baked as the aroma and texture will be an their peak, and don’t stay crisp for very long. They can be stored in an airtight container to keep them from absorbing humidity and consequently become less crisp.  The batter also can easily be frozen and thus can be made into tuiles when needed.

Green Tea Tuiles
For recipe in Indonesian, click HERE

Ingredients:


·         70g egg whites (from 2 eggs)
·         50g powdered sugar
·         60g melted butter
·         50g all-purpose flour
·         1 tablespoon green tea powder
·         ¼ teaspoon salt
·         100g Blanc almond slices (or nuts of your choices), toasted

Directions:
1.       Preheat oven to 325 degrees F (160 degrees C). Prepare a baking sheet lined with baking paper.
2.       Sift the flour and green tea powder.


3.       Beat egg whites with sugar and salt to stiff peak.  Fold in sifted flour and green tea powder in 2-3 addition, mix well until the batter firm and well-shaped.
4.       Add melted butter, fold until well combined.


5.       Scoop a spoonful of batter on the prepared baking sheet. Use the back of the same spoon to spread out the batter in circular motion to achieve 1-2 mm thickness.  Continue making some more circles, each about 1 cm apart because this batter won’t spread. Try to fit in as many as you can at once to save some baking time.


6.       Sprinkle generously almond slices on top and try have them stick to the batter, otherwise it will be off the cookies after baked.
7.       Bake the tuiles in preheated oven, for 10-12 minute depends on the thickness.  Take the cookies out when roughly 1-1.5 cm around the edge is golden. While the tuiles are being baked, prepare a rolling pin/cylinder objects/cups of that you want your tuiles to take their shape form.


8.       Take the sheet out of the oven. As quickly as you can, with an offset spatula, slip the hot cookie out of the pan, place it on the mold, and repeat with the rest of the cookies. You can also leave the tuiles flat.
9.       Repeat the same process with the second batch while the first batch is cooled.  After only few minutes, the cookies should be cool enough to be put into airtight container or for consumption.

Bahan:


·         70g putih telur (dari 2 butir telur)
·         50g gula halus
·         60g mentega, lelehkan
·         50g tepung terigu serbaguna
·         1 sdm bubuk green tea
·         ¼ sdt garam
·         100g Blanc almond slices (atau kacang sesuai selera), panggan sebentar

Cara:
1.       Panaskan oven dengan suhu 325 derajat F (160 derajat C), siapkan loyang yang telah dialasi dengan kertas roti.
2.       Ayak terigu bersama bubuk green tea.


3.       Kocok putih telur bersama gula dan garam sampai kaku. Masukkan campuran tepung dan bubuk green tea dalam 2-3 kali penambahan. Aduk lipat dengan menggukan spatula sampau bercampur.
4.       Tuang mentega leleh dan aduk lipat sampai bercampur


5.       Tuang 1 sendok teh adonan di atas permukaan kertas roti. Lebarkan adonan hingga menjadi tipis dengan menggunakan punggung sendok untuk mendapatkan ketebalan 1-2 mm dengan diameter 6 cm.  Penuhi permukaan kertas dengan adonan, beri jarak 1 cm.
6.       Beri taburan almond slices di atasnya. Tekan-tekan agar almond menempel agar tidak lepas pada saat kue sudah matang.
7.       Panggang selama  10-12 menit tergantung ketebalan kue. Keluarkan kue ketika pinggiran kue mulai tampak kecoklatan. Sementara itu siapkan rolling pin/benda berbentuk cylinder/cangkir yang akan dipakai untuk membentuk tuiles. 


8.       Keluarkan dari loyang, segera ambil dengan meggunakan spatula dan letakkan di atas ‘cetakan’. Ulangi sampai kue habis. Bisa juga dibiarkan dengan bentuk lingkaran. Setelah dingin, simpan di dalam wadah kedap udara.